My home organ
J. Kumičák
History
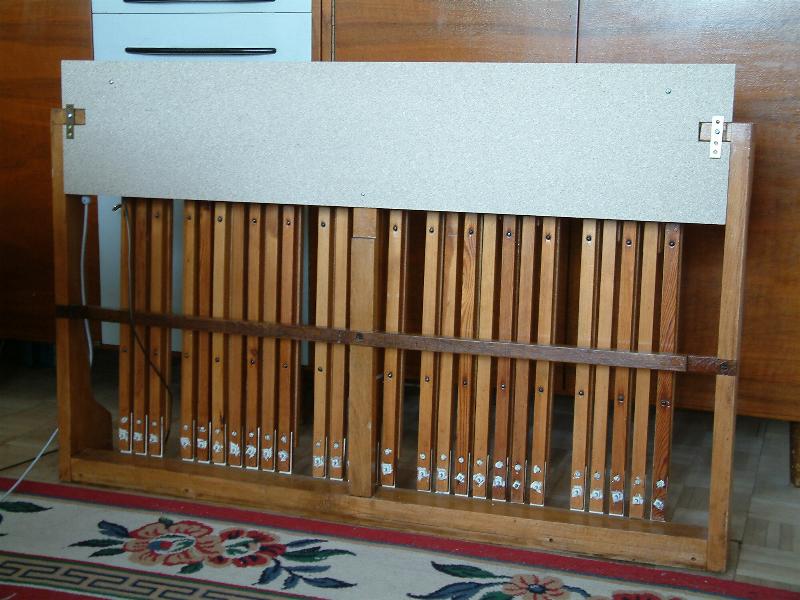
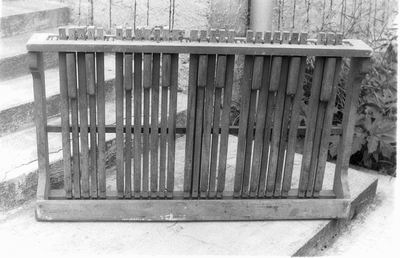 The idea to have at home my own organ first occurred to me already in 1985 when I found, at an organ builder, an old pedalboard with 27 keys (range C – e1). The pedalboard was incredibly dirty, marked with pigeon excrements and eaten by woodworms. The craftsman was glad to get rid of it for about $15 and I was happy to get the first piece of "real" organ for such incredibly low price.
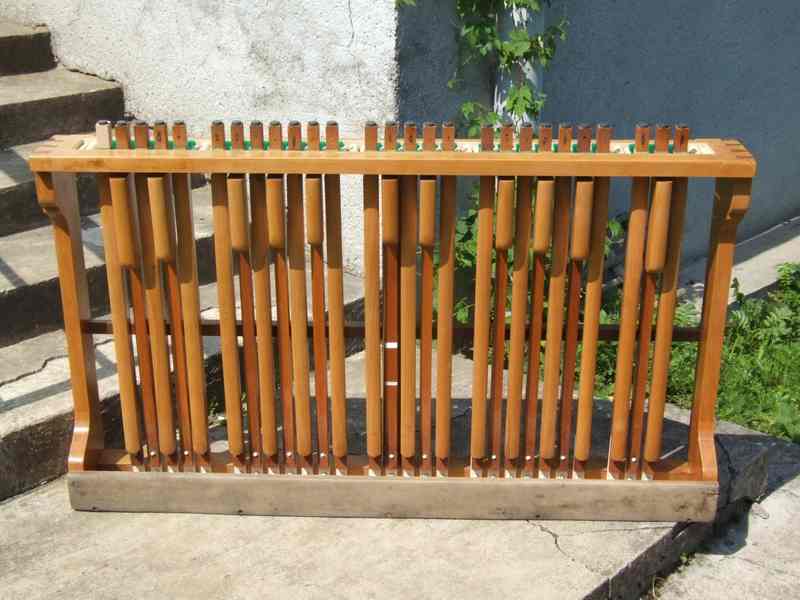
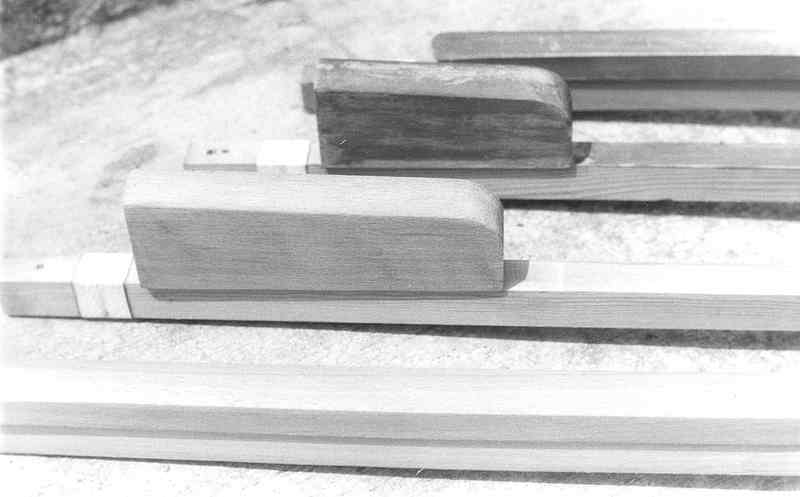
It took about month till I managed to put this – at least hundred years old – wooden article into acceptable state. First I scrubbed it thoroughly, but quickly, in water. Then I took it into pieces and cleaned every of them thoroughly – especially the keys. It turned out that the only effective way to do it perfectly was brushing the pieces with sandpaper which was accomplishable – in view of the value and uniqueness of the product – only by hand. The effectiveness of this obsolete method is clearly witnessed by comparison of original and cleaned keys. Afterwards the wood was impregnated with highly toxic Neopentalidol and the restoration concluded with application of several layers of various coats.  However, the result (photo from 2006) was worth the effort!
Remark: One can obtain clear idea about change brought about by thorough cleaning when comparing the cleaned pedalboard with small covering board which I left uncleaned since I did not consider it worth the effort.
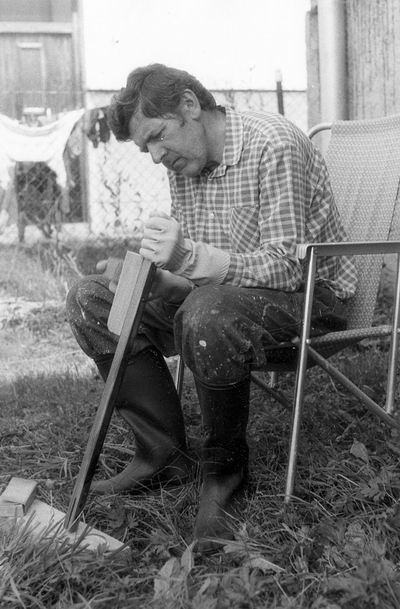
The pedalboard played an essential role in my attitude towards the prospective organ mainly because the former represents the only essential component of the instrument's playing technique which cannot be learned with another instrument. Organ playing skills namely represent a combination of manual and pedal play. I have learned how to play manual by playing piano but I had no experience with pedal play. My next goal was therefore to produce sound out of the pedal. In a short time I have constructed a printed circuit board representing a monophone sound generator and I have changed the pitch using a series of trimmer resistors. I have installed the trimmers directly on the pedalboard body, I have even had constructed a welded bench, but I had not enjoyed much music out of it. The problem turned to be where I expected it at least: I have tried all possible types of switches under keys but no type was sufficiently robust. I have ended with ridiculous doorbell buttons.
Moreover, playing solo pedal is not a great fun and the sound produced by my monophonic generator was rather poor – one could say euphemistically that it did not come in tune with any polyphonic instrument. In such a situation, however, I have discovered something I have not heard of before: I was playing violin and accompanied myself with the pedal! At that time I thought I have discovered a new form of one soloist duo but recently I have lost this illusion when I have learned that already Nicholas Bruhns (1665 - 1697) was triffling with both instruments in such a way. My performance at that time, however, was definitely hardly comparable to the brilliant play of Ch. Ganswindt the recording of which I found on the internet only recently. This example demonstrates that limited possibilities may sometimes lead to surprising achievements.
At that time I was invited to spend one year at the Uppsala University which brought a sudden halt to my organ building enthusiasm. I have returned from Sweden with Yamaha DX21 synthesizer (two years later the visit was repeated and I have come back with a cheap second-hand Roland αJuno-1) and I tried in vain to find a simple plan to "midify" the pedalboard. Some time later I began to be involved in computer aided FM synthesis of sounds (using cheap ATARI ST 1040, equipped by default with MIDI interface) and the pedal fell into oblivion.
In February 2006 I came on Internet across a description of Aeolus, a program simulating very faithfully a pipe organ in the Linux environment. As an illustration of its qualities I recommend listening to the short recording of the well known carol Es ist ein Ros' entsprungen (2:49), or to the choral prelude In Dulci Jubilo by Buxtehude (2:15), or to the choral prelude by J. S. Bach, Kommst du nun, Jesu, von Himmel herunter, BWV650 (3:44). When listening to the music generated by Linux I have remembered my pedalboard, reposing idly at my holiday home for twenty years. So I entered with fervor into the plan of building my own home organ. I have pictured the goal as having in my computer e. g. Aeolus and control it with pedalboard and synthesizers Yamaha and Roland.
Further web surfing discovered existence of many sites describing successful home organ building projects. I would mention just a few of many which helped me much:
which helped me much.
In building the organ I decided to proceed so that any partial step would represent a useful approach to the final goal and would at the same time represent a motivation for the steps to follow. I namely considered the building to be primarily an entertainment and the latter should bring the results rather soon – if it should be a pleasure at all. I pictured the first step in the direction of the final goal as making of the pedalboard the source of MIDI signals which could be fed preliminary to the synthesizer.
A description of the organ building follows roughly in chronological order.
Pedalboard
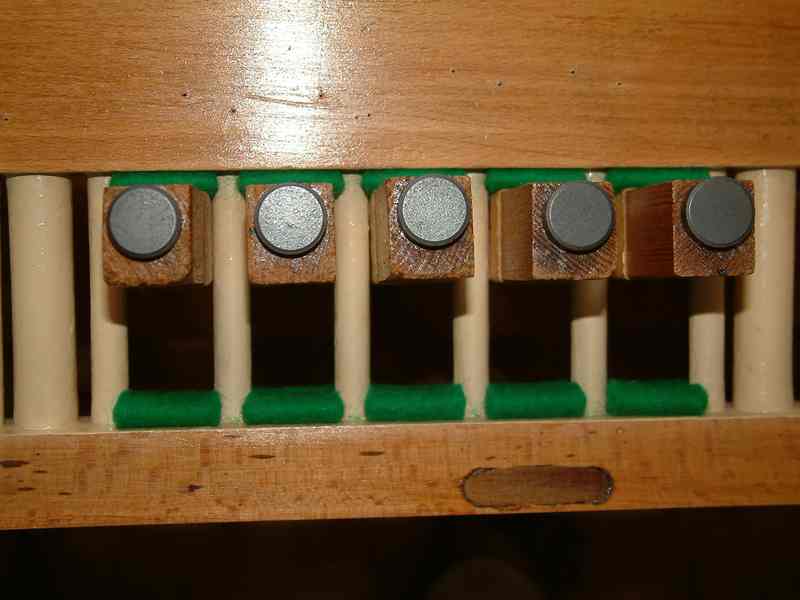
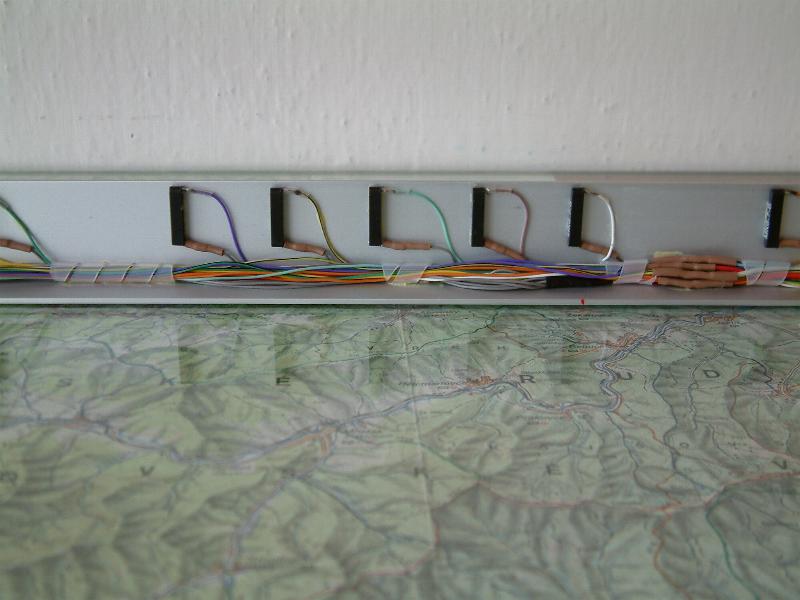
On the web I have at first found a module described at the page of an German company WIRA. My attention was there attracted by the solution using Hall sensors. I was about to order the module when I found – in my opinion more elaborate – solution of the Czech company Berio MIDI and without long hesitation I have ordered it. At stationer's I was then looking for all possible magnets. I have collected about five types and dimensions – all cheap, ferrite ones, meant for magnetic boards and I was afraid that their fields will not be, consequently, sufficiently strong. When the Berio MIDI 32 module was still on its way to me, I have rejected the solution with Hall sensors since it did not enable flexible and simple adjustment of the relative distance of magnets and sensors. I have therefore turned my attention to the solution using reed sensors. At one local dealer I have borrowed several types of these sensors and started experimenting with interaction of magnets and switches. It turned out that the reed switch Meder MK 67 B reacts sensitively even to the smallest and cheapest ferrite magnet (of 16mm diameter and 5 mm thickness) and detects them already at the distance of 10 mm. I was at first surprised that the sensor was switching off when the magnet axis was directed to its center. But I understood it quickly: the magnetic field is solenoidal and in the center its action on the reeds cancels. It turned out that there is a vertical tolerance about 10 mm between on and off switching, which was in my case a rich clearance. This settled the choice of the sensor type – I have not tested Hall nor optical sensors. A few days later I have received the Berio MIDI 32 module.
Remark: Point of speech for the pedal keys required by AGO is in the midway between top and bottom of their travel. This was easily adjusted by positioning the magnets and can be anytime shortened in case of need by few millimeters simply by putting another magnet on top of the previous one.
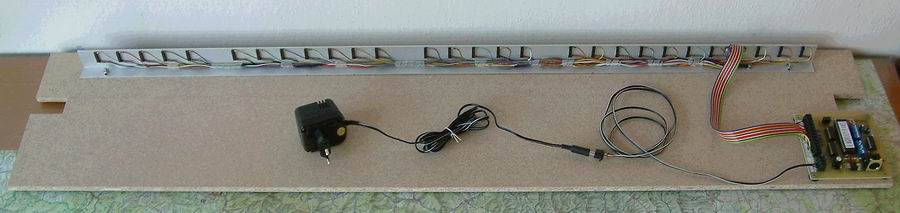
I have provided both ends of every rectangular opening in the pedalboard frame – mechanically guiding the motion of the keys – with felt paddings (serving to damp heavier strokes and to eliminate unpleasant knocking caused by hitting of wood to wood). I have affixed the paddings with the use of dispersion glue Wurstol – it is said to remain permanently resilient after hardening. Since the trials indicated that relative position of magnets and sensors is not crucial, I decided to place sensors fixed on an aluminium lath and attach the magnets equally fixed onto the fronts of the keys, since the length of the latter fluctuated just within 2 mm – an incredible precision of the handwork of anonymous organ builder. I have thus used neither frequently mentioned adjustable magnets nor sensors. The only movable part of my simple solution is the aluminium holder of sensors as a whole (adjustable in both horizontal and vertical directions).
 Since I consider gluing the best method for attaching small pieces, I have fixed 27 round magnets to the key fronts with glue and opposite to them, I have glued on an aluminium lathe (20 x 35 mm), 27 sensors with diodes and pertinent wiring according to description furnished with the Berio module. As the glue I have used Chemoprene Extreme (Henkel). Magnets have been positioned on keys as far as possible from sensors since due to compression of felt I reckon on gradual lowering of the keys. Magnetic field represents an ideal interface and that is why I have decided to put the borderline between the old pedalboard and the new electronic circuitry exactly in the middle of invisible magnetic field and I have screwed the lathe and the module to a separate board. With this I have also satisfied my preference of modular construction. The anonymous Orgelbaumeister made a cutting about 6mm deep at the bottom of the front side of pedalboard across its full width. The purpose of this remains unclear to me but in an effort to exploit all properties of the artifact I made this coincidence a simple method of fastening the board so that it would be readily detachable.
The module is thus placed under the pedalboard (in safe distance from the keys). In this position its DIP switches can easily be set up, and the control lights are well visible in case of eventual diagnostics. I expect to cover it upon completion with appropriate shielding.
Bench
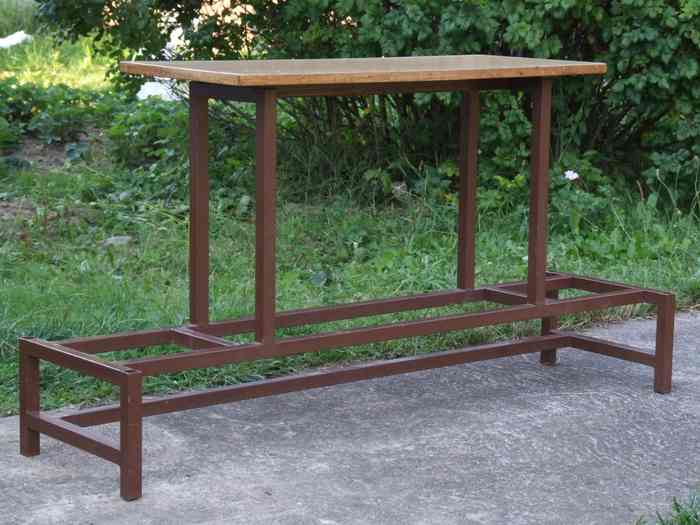
 To be able to exercise the technique of pedal play already at this stage – be it only with this preliminary MIDI controller hooked to a synthesizer – I still needed a bench (one can put synthesizer anywhere). The original one seemed utterly unsuitable due to twenty years of storage in the dusty loft. The flat in the appartement house I am living in has a standard property: incredibly small area. My pedalboard, on the contrary, has a nonstandard one: between keys and the frame there is a gap which could accept about two keys on each side. Every centimeter saved on the width represents a gain in a small flat; that is why I have not chosen a usual concept of bench covering the whole width of the pedalboard but have decided to put the bench legs into the gaps. Since I am impatient and fond of welding constructions, I have decided to have a welded bench. A skillful welder has welded the construction from pieces of Jäkl 25x25mm steel profile cut to measure in only few minutes. After painting, mounting the box for keeping music scores and attaching a hinged kitchen working board, it looked quite fine. The exercises could start!
Remark: Few months later when I took the finished instrument to my holiday home, the original bench appealed to me more than the new one after just a week of use. That is why I have adapted it so that now I have two benches: one at home, another one at holiday resort.
Organ sound
Concurrently with the preparation of these equipments also necessary for the play, I was working on creation of the cornerstone of the future organ: the sound source. Earlier I decided that it would be quite useful to have the organ also at my holiday home and that is why all the preparatory work was done for the portable notebook (Fujitsu Lifebook) with the intention to repeat the succesfull installation also on the desktop computer. Since I have chosen Aeolus, running on Linux, to be my source of the organ sound (mainly due to its moderate requirements on processor speed and operation memory), I had to equip the computers with the operating system (OS) I was not using before.
The installation of the (Gentoo) Linux went along smoothly, but the things became less straightforward with the sound. Linux requires, as every OS, for operation of peripherals – including the sound card and MIDI interface – corresponding adequate drivers. The producers of peripherals, however, are not interested in support of Linux since this OS is not commercially interesting – one cannot expect profit out of it – and consequently they do not supply corresponding drivers. The latter (called frequently "firmware") are submitted by Linux enthusiasts only and it is evident that their variety is not as broad as one would wish. Therefore, the first thing to do when preparing sound application in Linux is to verify the support of peripherals one is going to use. Fortunately, sound applications in Linux represent a rapidly growing field (known under the name Linux Audio) and one can even find reviews of available drivers. In one such list I have found the driver for my hardly standard sound card VIA AC'97 Audio, implemented accidentally in both my computers.
The next step was to connect the manuals and the pedal, as MIDI signal sources, to the computer. It turned out that all the requirements (including the number of supported components: three manuals and one pedal) can be satisfied with the help of the USB MIDI interface Midisport 4x4, the product of M-Audio. I have consequently bought this product and downloaded the corresponding firmware.
I was left only with few hours to tinker with MIDI channels and other details, and my notebook started to generate (via a quality amplifier and good loudspeakers) magnificent tones of simulated organ. The reader can obtain clear idea of my excitement from listening to Prelude and Fugue in C major, BWV547 by Bach. The recording is rather long (9:19), but demonstrates very well the extent to which Aeolus can be expected to approximate the powerful organ sound. There was no end to my delight: I had a musical instrument with splendid sound which required – besides the things I had before – only pedal module and USB-MIDI interface. I could not imagine a cheaper organ! Adding the organ sound to the desktop computer met no problems.
It should be noted that in the beginnings I was also entertaining the idea of applying for sound generation the sound cards using the so-called SoundFonts. I was, however, discouraged by many internet discussions treating the delay (time elapsed between pressing the key and sounding the tone) of the cards which suggested that the delay represents an essential problem in this solution. To overcome it may require exchanging the processor for more powerful one with all (not only economical) consequences. I have finally abandoned this alternative after I have tested under Windows the Timidity program, on which Mr. Žurek has built his organ solution. The delay (usually denoted as "latency") reached on my desktop almost the whole second which literally disabled the play.
Console
Naturally, I was enjoying the sounding organ for few days but then a time came to abandon the stopgap and put the work into the definite state. In other words, it was necessary to locate everything so that I could sit down on the bench and after pushing on – ideally one – switch, start playing. After all, that was the aim of all my endeavors. And since Aeolus is meant for three manuals the idea to add the third cheap second-hand synthesizer started to excite me.
Of course, I was thinking about the solution of the console (Spieltisch in German) since the very beginning of my interests in organ building. Some twenty years ago I have found in a textbook for students of Czech conservatory (V. Bělský, Náuka o varhanách, Editio Supraphon, Praha 1982} a description of a typical console with a drawing containing the crucial dimensions. I have compared the latter with my measurements performed on several organs. Later I have learned that the Union of German Organ Builders {Bund Deutscher Orgelbaumeister, BDO for short) and afterwards also the similar American organization (American Guild of Organists, AGO) have issued binding standards concerning the general look and dimensions of organ consoles. However, since both organizations wish to gain a profit even out of few pages brochures, they either do not publish their documents on the internet, or publish just a short excerpts. I was, however, able to find a detailed drawing British Organ Console Dimensions of a recommended standard from the year 1967 and I have accepted the detailed data given therein as the standard for me which I in general followed. I was no more bothered by BDO nor AGO standards: what a difference can it make if my console will have dimensions in accordance wit British, German or American standards?
Remark: After some time even this document disappeared from the site www.sidneys.org, and that is why I am referring to its copy which I have providently saved.
At this place I must open up to the reader with my indignation with the decline of the furniture – or maybe, in general, timber – industry. Classical lathwork boards, manufactured by reliable glueing of timber laths and covered with quality veneer, were sometimes in the mid-seventies replaced (I do not know whether only in the Czechoslovak Republic or all over the world) by chipboard. As far as I know, the latter is produced by pressing sawdust mixed with a glue and the resulting product is being plastered with – perhaps only one micron thin – imitation of veneer. Disregarding the inner absurdity of the technology in which originally compact wood is being milled to sawdaust which is afterwards compactified to "boards", these products have also other essential drawbacks: they cannot be worked (try to plane them!), they are excessively heavy, and mainly lack bending strength completely. You cannot expect a shelf to carry without excessive bending a few books, you cannot risk drilling a hole into it; if you once screw something into it, you cannot repeat it second time at the same place without serious consequences. I had to strengthen or support furniture made of such "boards" in various awkward manners after obtaining it. I actually cannot imagine what purposes is such material meant for but its use for construction of furniture should be strictly contraindicated.
Such experiences – known to every amateur joiner in Slovakia – led me quite naturally to the idea of metal construction also in the case of the console. I have decided to design the latter as a welded frame covered with wooden boards only for decorative purposes. My console should, moreover, meet an untypical "boundary condition": the manuals had to be commercial synthesizers, even of different brands. The greatest problem seemed to be the vertical distance of adjacent manuals which should be (according to the above mentioned British standard) 63-70 mm. This dimenstion should be kept for very important reason of playing technique and in my opinion it permitted no compromise, especially not such one as we use to see in popular music productions. The problem, how to put two 80 mm high synthesizers so as to obtain the required distance, occupied my mind for a long time. I was even considering the possibility of stripping the "unnecessary" casings and connecting somehow the bare keyboards. However, one day I put the instruments directly on each other and discovered that in such position the keys of Roland are only 62 mm above the keys of Yamaha. In such a way a simple solution was born: putting the Yamaha on a flat board put next synthesizers with their hind feet on exactly positioned shelves and with front feet on lower synthesizers (it might be necessary to shorten or remove the front feet). Since this solution results from the specific shapes of the instruments which I had at my disposal the eventual third synthesizer should be again Roland – but this time the five octaves (61 keys) αJuno-2, differning in shape from the Juno-2 only in width and it would be used as the second manual. I have immediately put an advertisement about the purchase on the internet.
While waiting for eventual replies, I was thinking of moving Juno-1 one octave to the right which would liberate me from the necessity to do something with relatively large modulation wheels of Yamaha. At last, however, I have decided for the standard solution: interpretation of the baroque music is possible without the fifth octave – but the upper one. And the keys of the same nominal pitch should indeed lie above each other. So I disassembled Yamaha to take the wheels out of it. But upon opening the instrument I have found that the wheels can be lowered inside without the need to interfere with the electronic circuitry.
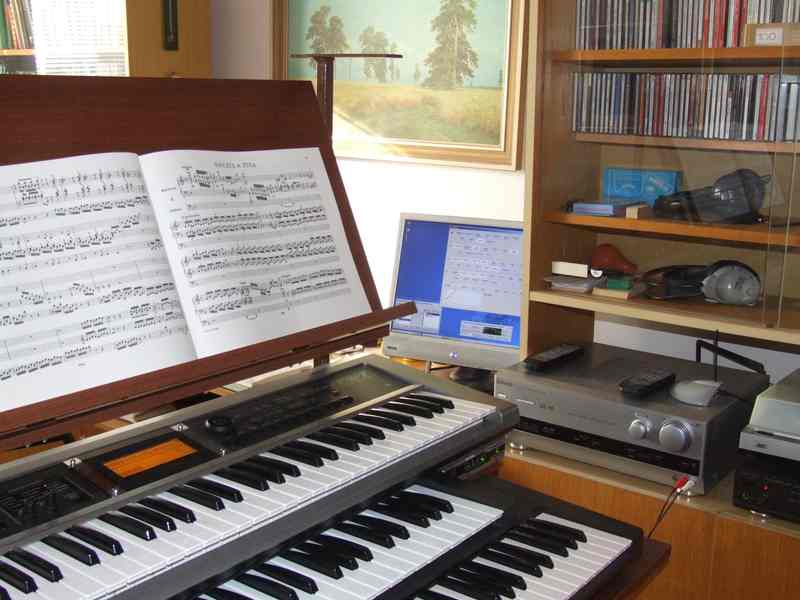
After a month of waiting (and searching at various second-hand shops) I realized that it is highly improbable that I would find a specific instrument (moreover in a usable condition) and that is why I started looking after a different solution. Among brand new synthesizers Roland GW-7 seemed quite acceptable in view of its price and dimensions. It is true, that as a MIDI controller it was unnecessarily expensive but the idea to have at home also a multitimbral synthesizer for "non organ" musical performances seemed quite appealing – especially when dedicated MIDI keyboards do not use to be much cheaper and are usually larger. That is why I have bought GW-7. It turned out that thanks to its dimensions it easily fits into my console. The only missing item remained a music rest which I made quite provisionally of awful chipboard. In such a way I have finished a fully functional instrument shown at the following picture (state as of 26. 11. 2006).
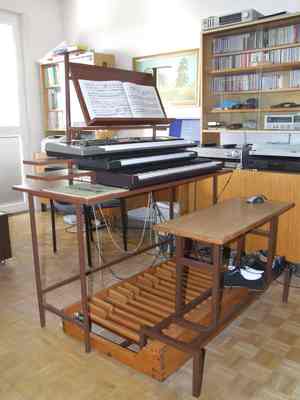 What the picture shows looks like almost finished product with manuals of unequal length, MIDI controller located to the right of the second manual, too robust music stand and a synthesizer located in unpractical height. The completness of the instrument is, unfortunately, a mere illusion, since too much remains to be done. The view of the monitor is inconvenient for the player, the control of stops by moving the wireless mouse over the board is not too clever, connection of the computer to the multifunction amplifier is possible only due to the specific location of the organ (the latter is meant for another room lacking the amplifier). Of course, I have taken everything mentioned into account: the top of the construction will accomodate a board with separate amplifier, loudspeakers and monitor. The welded frame will be covered by panels so that the finished instrument will look like a closed cabinet. Lamps will be attached at appropriate places to illuminate music rest and pedalboard. The bench will have a thick sitting board and side steps, even a shelf for keeping music scores. To prepare all this will, however, require time. Now I will indulge in leisure and undisturbed play. For the latter purpose I have bought linen dance shoes which I am alternating with old shoes with leather soles (such shoes are not commonly sold now), to which leather heels were attached by a shoemaker. I have not decided yet which shoes are better to play with but it seems that the thin leather soles of dance shoes are ideal for feeling the pedal keys during initial lessons ...
(To be continued)
Appendix: Organ – the first synthesizer
(The article will be extended – and translated into English – gradually, as the organ construction continues. )
Home
Visits:
(since 1. 9. 2006)
 The idea to have at home my own organ first occurred to me already in 1985 when I found, at an organ builder, an old pedalboard with 27 keys (range C – e1). The pedalboard was incredibly dirty, marked with pigeon excrements and eaten by woodworms. The craftsman was glad to get rid of it for about $15 and I was happy to get the first piece of "real" organ for such incredibly low price.

